AdMob Mediation SDK (Android)
Overview
We have 3 part to integrate Appier Mobile SDK through AdMob Mediation SDK for Android
- Ad Server Setting
- Integrating Appier Mobile SDK
- Predict Mode (Optional)
Current Support Ad Format
- Native Ads
- Banner Ads
- Interstitial Ads
SDK version requirements
Refer to the table below to see the compatible versions of the Appier Ads and AppLovin MAX Mediation SDK.
| Appier Ads Android SDK (standalone) | AdMob Mediation SDK |
|---|---|
| 2.0.2 | 2.0.1 |
| 2.1.0 | 2.1.0 |
1. Ad Server Setting
Step 1 - Ad Unit Setting
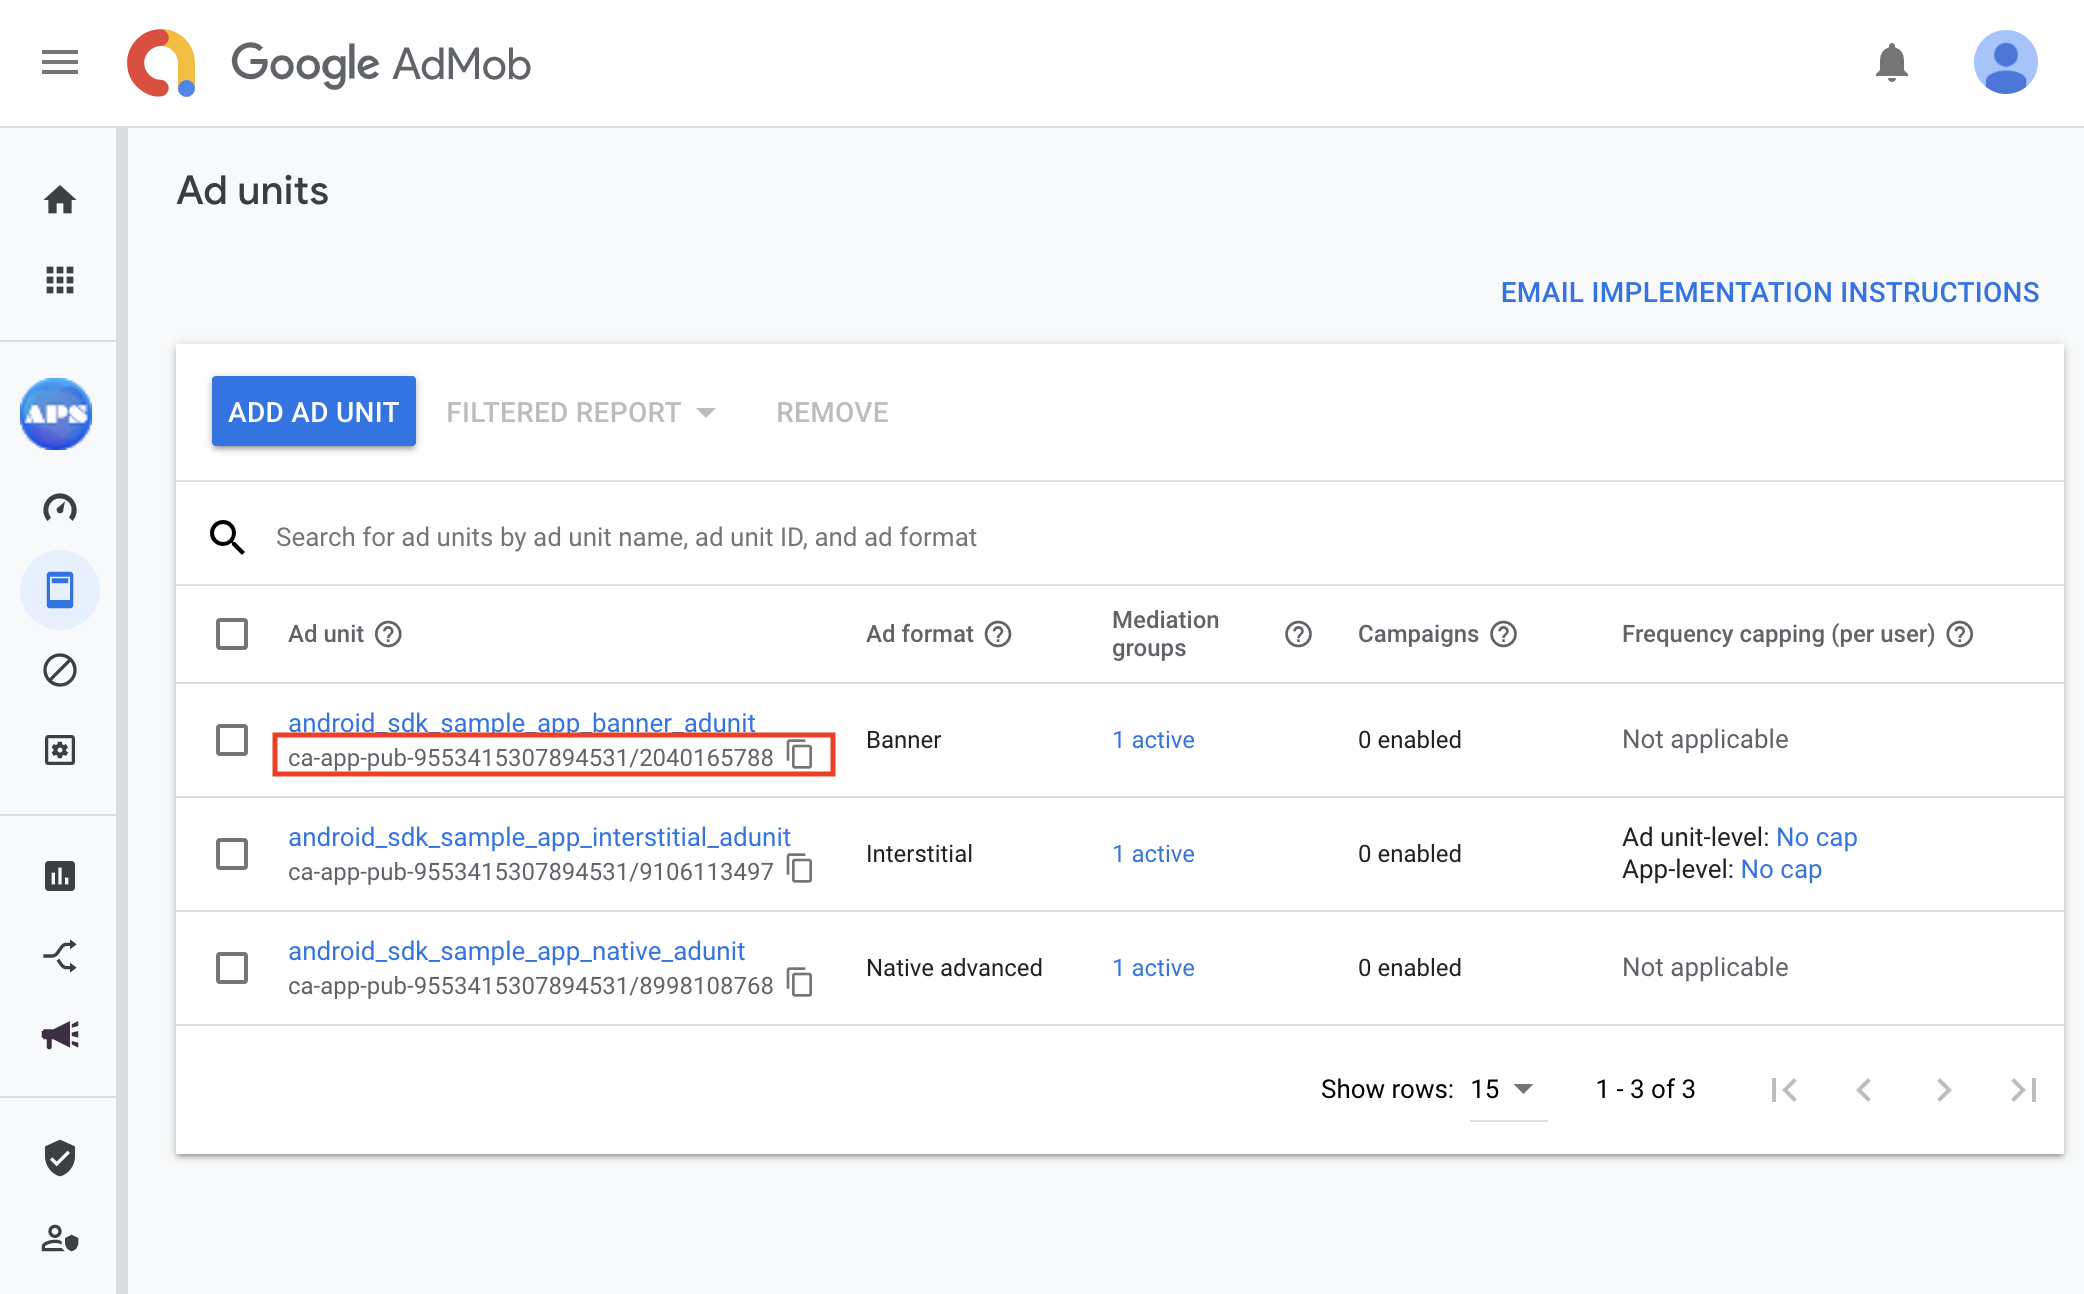
- Get AdMob Ad unit ID for the App
You will need the ad unit ID from AdMob and place it in the Android App. To find out your ad unit ID, go to ad unit page and get the ad unit ID.
Note: This is NOT the ad unit id from Appier.
Step 2 - Line item for Appier Mediation
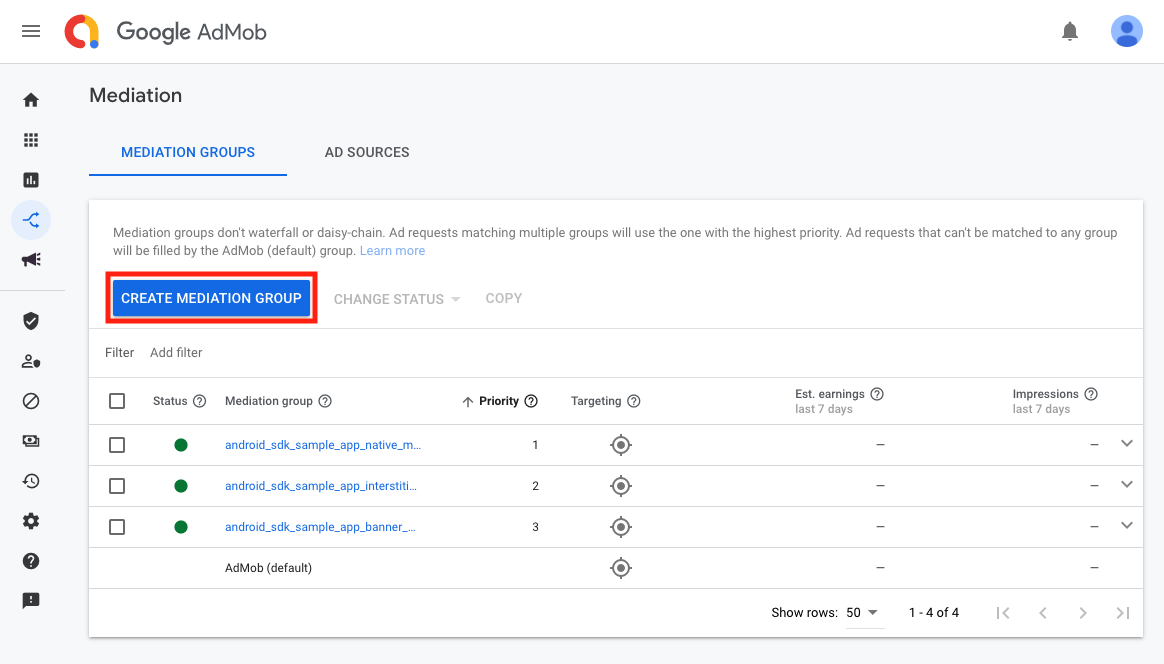
- 2.1 Setup your mediation group
In the Mediation page, please click CREATE MEDIATION GROUP button if you did not have mediation group
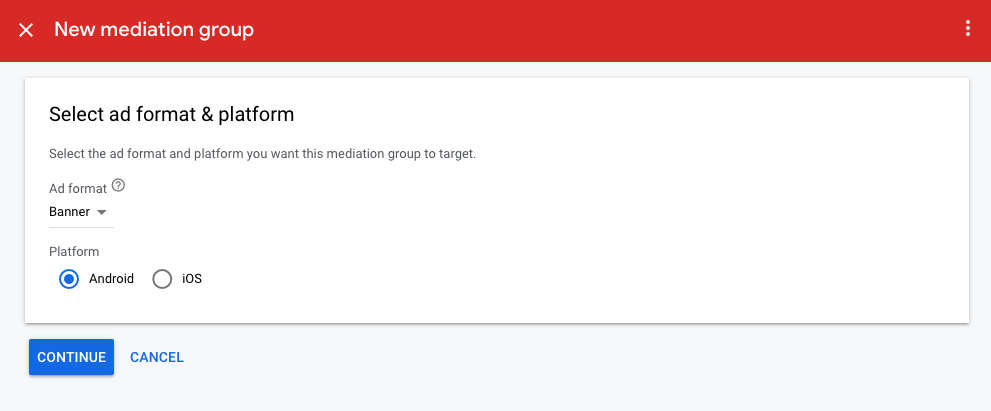
Choose your ad format and Select Android platform. After finish the setting, click CONTINUE button.
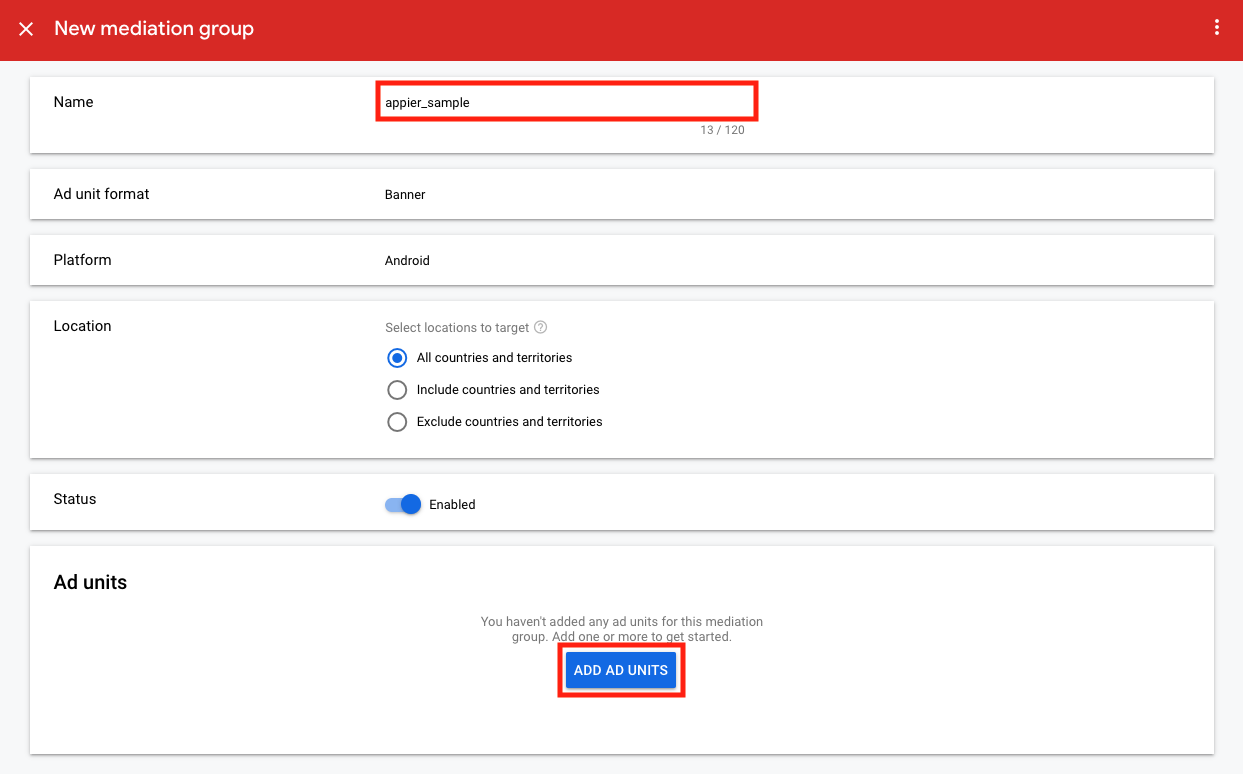
Fill in the mediation group name and add your ad units in the Ad units block. After add your ad unit in the Ad units block, the Ad sources block will appear.
- 2.2 Setup custom event
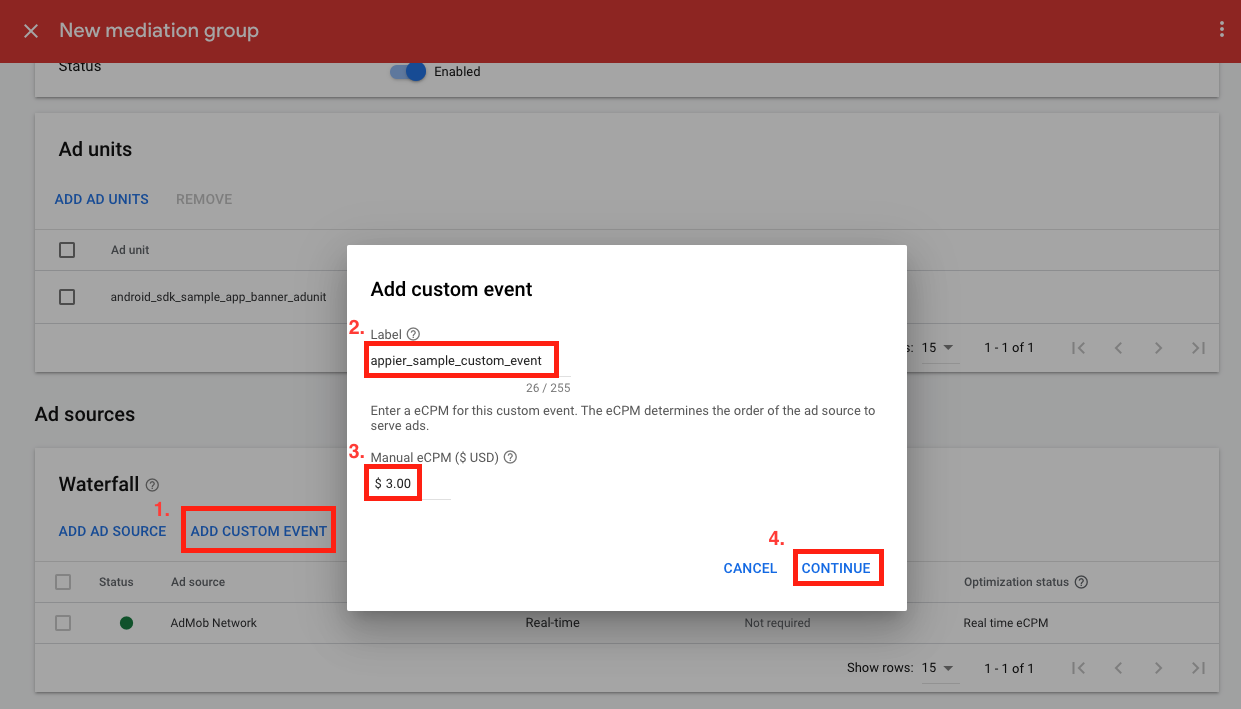
Click ADD CUSTOM EVENT and set your label for Appier custom event. Also, use the price you discussed with Appier Partnership team to set the eCPM.
After all the setting ready, click CONTINUE.
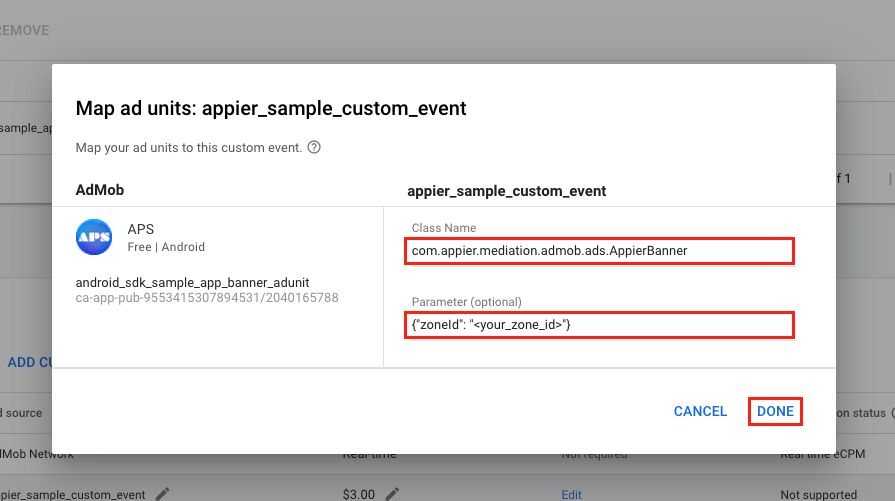
Next, we should set up custom event class name and parameter.
Currently, Appier supports three ad types, and please fill the class name by your ad type:
- Banner: com.appier.mediation.admob.ads.AppierBanner
- Interstitial: com.appier.mediation.admob.ads.AppierInterstitial
- Native advanced: com.appier.mediation.admob.ads.AppierNative
For parameter, fill in the json {"zoneId": "<your_zone_id>"}, where zoneId is provided by Appier.
Click DONE when you finish the setting.
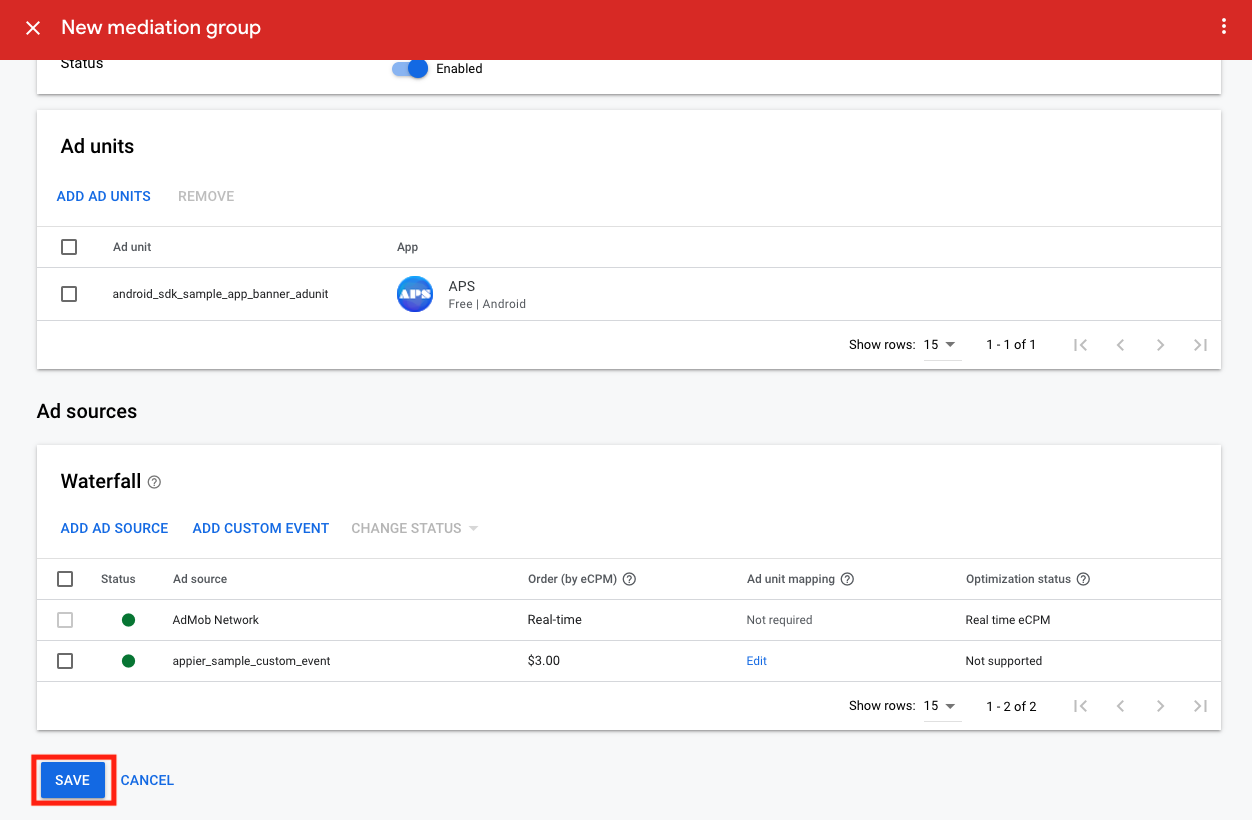
After you finish all of the mediation group setting, you can click SAVE and integrate your Android app with Appier Mobile SDK.
2. Integrating Appier Mobile SDK
In the previous section, we went through the setup of AdMob web UI. I believe you've already had at least one ad unit ID. In this section, we will focus on how to integrate Appier's SDK and start monetizing your app.
Steps Overview
- Prerequisites
- Gradle Configuration
- AdMob Dependency
- Appier Dependencies
- Manifest Configuration
- GDPR Consent
- Ad Format Integration
- Native Ads Integration
- Banner Ads Integration
- Interstitial Ads Integration
Github Repository
Both the mediation source and sample app are open sourced on Github: appier/admob-android-mediation. The latest release version is [1.0.0]
(https://github.com/appier/admob-android-mediation/tree/1.0.0).
Step 1 - Prerequisites
- Make sure you are using AdMob Android SDK version >= 17.0.0
- Make sure your app's API level >= 18
Step 2 - Gradle Configuration
2.1 - AdMob Dependency
Please add google to your repositories, and specify AdMob's dependency
repositories {
		// ...
  	google()
}

dependencies {
  	// AdMob SDK
  	implementation 'com.google.android.gms:play-services-ads:19.0.1'
}
2.2 - Appier Dependencies
Please add mavenCentral to your repositories, and specify Appier's dependencies.
repositories {
  	// ...
  	mavenCentral()
}

dependencies {
  	// ...
  	implementation 'com.appier:ads-android:2.0.0'
  	implementation 'com.appier:ads-admob-mediation:1.0.0'
}
Step 3 - Manifest Configuration
To prevent your app from crashing, following are the recommended manifest configurations.
<manifest ...>
  <uses-permission android:name="android.permission.INTERNET" />
  <uses-permission android:name="android.permission.ACCESS_NETWORK_STATE" />

  <!--  Required for displaying floating window  -->
  <uses-permission android:name="android.permission.SYSTEM_ALERT_WINDOW" />

  <application
    ...
    android:networkSecurityConfig="@xml/network_security_config">

    <uses-library android:name="org.apache.http.legacy" android:required="false" />

		<!-- [AdMob] Application ID -->
    <meta-data
        android:name="com.google.android.gms.ads.APPLICATION_ID"
        android:value="ca-app-pub-xxxxxxxxxxxxxxxx~yyyyyyyyyy"/>
  </application>
</manifest>
You also need to add xml/network_security_config.xml into resources.
<?xml version="1.0" encoding="utf-8"?>
<network-security-config>
  <base-config cleartextTrafficPermitted="true" />
</network-security-config>
Step 4 - GDPR Consent (Recommended)
In consent to GDPR, we strongly suggest the consent status to our SDK via Appier.setGDPRApplies() so that we will track user's personal information. Without this configuration, Appier will NOT apply GDPR by default. Note that this will impact advertising performance thus impacting revenue.
import com.appier.ads.Appier;

public class MainActivity extends AppCompatActivity {
  	@Override
    protected void onCreate(Bundle savedInstanceState) {
      	// ...
      	Appier.setGDPRApplies(true);
    }
}
Step 5 - Ad Format Integration
Overview
- 5.1 - Native Ads
- 5.2 - Banner Ads
- 5.3 - Interstitial Ads
5.1 - Native Ads Integration
To render Appier's native ads via AdMob mediation, you need to provide <your_ad_unit_id_from_admob> and <your_zone_id_from_appier>. You can either pass through localExtras or serverExtras.
import com.appier.ads.common.AppierDataKeys;
import com.appier.mediation.admob.ads.AppierNative;
import com.google.android.gms.ads.AdLoader;
import com.google.android.gms.ads.AdRequest;
import com.google.android.gms.ads.formats.UnifiedNativeAd;
import com.google.android.gms.ads.formats.UnifiedNativeAdView;


Bundle localExtras = new Bundle();
localExtras.putString(AppierDataKeys.AD_UNIT_ID_LOCAL, "<your_ad_unit_id_from_admob>");

// Inflate the layout
final UnifiedNativeAdView nativeAdView = (UnifiedNativeAdView) getLayoutInflater().inflate(R.layout.template_admob_native_ad, null);

AdLoader adLoader = new AdLoader.Builder(mContext, "<your_ad_unit_id_from_admob>")
        .forUnifiedNativeAd(new UnifiedNativeAd.OnUnifiedNativeAdLoadedListener() {
            @Override
            public void onUnifiedNativeAdLoaded(UnifiedNativeAd unifiedNativeAd) {
                populateUnifiedNativeAdView(unifiedNativeAd, nativeAdView);
                mAdContainer.addView(nativeAdView);
            }
        })
        .build();

// Load Ad
adLoader.loadAd(new AdRequest.Builder()
        .addCustomEventExtrasBundle(AppierNative.class, localExtras)
        .build());
The template_admob_native_ad is a xml template of UnifiedNativeAdView.
You can get more details on the Native Ads Advanced.
<com.google.android.gms.ads.formats.UnifiedNativeAdView
    xmlns:android="http://schemas.android.com/apk/res/android"
    android:layout_width="match_parent"
    android:layout_height="wrap_content">
    <LinearLayout
    android:orientation="vertical"
    ... >
        <LinearLayout
        android:orientation="horizontal"
        ... >
          <ImageView
           android:id="@+id/ad_app_icon"
           ... />
          <TextView
            android:id="@+id/ad_headline"
            ... />
         </LinearLayout>


         // Other assets such as image or media view, call to action, etc follow.
         ...
    </LinearLayout>
</com.google.android.gms.ads.formats.UnifiedNativeAdView>
The populateUnifiedNativeAdView sets the text, images and the native ad, etc into the ad view. You can specify Appier native view through the method getAdvertiser() of AdMob native ad.
import com.appier.mediation.admob.AppierAdapterConfiguration;
import com.google.android.gms.ads.formats.UnifiedNativeAd;
import com.google.android.gms.ads.formats.UnifiedNativeAdView;

void populateUnifiedNativeAdView(UnifiedNativeAd nativeAd, UnifiedNativeAdView adView) {
        adView.setVisibility(View.VISIBLE);

        // when the advertiser name is `Appier`, the ad is provided by Appier.
        if (nativeAd.getAdvertiser() != null && nativeAd.getAdvertiser().equals(AppierAdapterConfiguration.getAdvertiserName())) {
            // ...
            adView.setHeadlineView(adView.findViewById(R.id.ad_headline));
            ((TextView) adView.getHeadlineView()).setText(nativeAd.getHeadline());
            adView.setIconView(adView.findViewById(R.id.ad_app_icon));
            ((ImageView) adView.getIconView()).setImageDrawable(nativeAd.getIcon().getDrawable());
            adView.setNativeAd(nativeAd);
        }
    }
5.2 - Banner Ads Integration
To render Appier's banner ads via AdMob mediation, you need to specify the width and height of ad unit to load ads with suitable sizes. You can either pass through localExtras or serverExtras.
import com.appier.ads.common.AppierDataKeys;
import com.appier.mediation.admob.ads.AppierBanner;
import com.google.android.gms.ads.AdView;

// ...
Bundle localExtras = new Bundle();
localExtras.putInt(AppierDataKeys.AD_WIDTH_LOCAL, 300);
localExtras.putInt(AppierDataKeys.AD_HEIGHT_LOCAL, 250);
localExtras.putString(AppierDataKeys.AD_UNIT_ID_LOCAL, "<your_ad_unit_id_from_admob>");

AdView adView = getView().findViewById(R.id.admob_banner_ad);

// Load Ad
adView.loadAd(new AdRequest.Builder()
        .addCustomEventExtrasBundle(AppierBanner.class, localExtras)
        .build());
You also need to define the adSize and adUnitId otherwise the ad would not display correctly.
<com.google.android.gms.ads.AdView
    android:id="@+id/admob_banner_ad"
    android:layout_width="300dp"
    android:layout_height="250dp"
    ads:adSize="MEDIUM_RECTANGLE"
    ads:adUnitId="<your_ad_unit_id_from_admob>">
</com.google.android.gms.ads.AdView>
5.3 - Interstitial Ads Integration
To render Appier's interstitial ads via AdMob mediation, you need to specify the width and height of ad unit to load ads with suitable sizes. You can either pass through localExtras or serverExtras.
Bundle localExtras = new Bundle();
localExtras.put(AppierDataKeys.AD_WIDTH_LOCAL, 320);
localExtras.put(AppierDataKeys.AD_HEIGHT_LOCAL, 480);
localExtras.putString(AppierDataKeys.AD_UNIT_ID_LOCAL, "<your_ad_unit_id_from_admob>");
InterstitialAd interstitialAd = new InterstitialAd(context);

interstitialAd.setAdUnitId("<your_ad_unit_id_from_admob>");

// Load Ad
mInterstitialAd.loadAd(new AdRequest.Builder()
        .addCustomEventExtrasBundle(AppierInterstitial.class, mLocalExtras)
        .build());
3. Prebid Mode (Deprecated)
Predict Mode is an optional feature that provides a function to do the Ad response prediction before real AdMob line items are triggered. It is recommended to do the prediction at the previous activity/user view before rendering ads.
We are now only supporting predict mode on display ads (Banner / Native Banner / Interstitial Banner).
Refer to pmp-android-example for sample integrations.
Requirement
- Activation: Please contact Appier's agent to activate predict mode for your APP.
How to predict Ads
We recommend to do the prediction at the previous activity/user view before rendering ads.
import com.appier.ads.AppierPredictor;
import com.appier.mediation.admob.AppierAdUnitIdentifier;
import com.appier.mediation.admob.AppierPredictHandler;

public class MainActivity extends AppCompatActivity {
   @Override
   protected void onCreate(Bundle savedInstanceState) {
       // ...
       AppierPredictor predictor = new AppierPredictor(
           getContext(),
           new AppierPredictHandler(getContext())
       );
        // Predict by the ad unit id. It is recommended to do the prediction
        // at the previous activity/user view before rendering ads.
       predictor.predictAd(new AppierAdUnitIdentifier("<your_ad_unit_id_from_admob>"));
}
Updated 3 months ago
