AdMob Mediation SDK - iOS
Overview
We have 3 parts to integrate Appier Mobile SDK through AdMob Mediation SDK for iOS
- Ad Server Setting
- Integrating Appier Mobile SDK
- Enabling Test Ads
Current Support Ad Formats
- Native Ads
1. Ad Server Setting
Step 1 - Ad Unit Setting
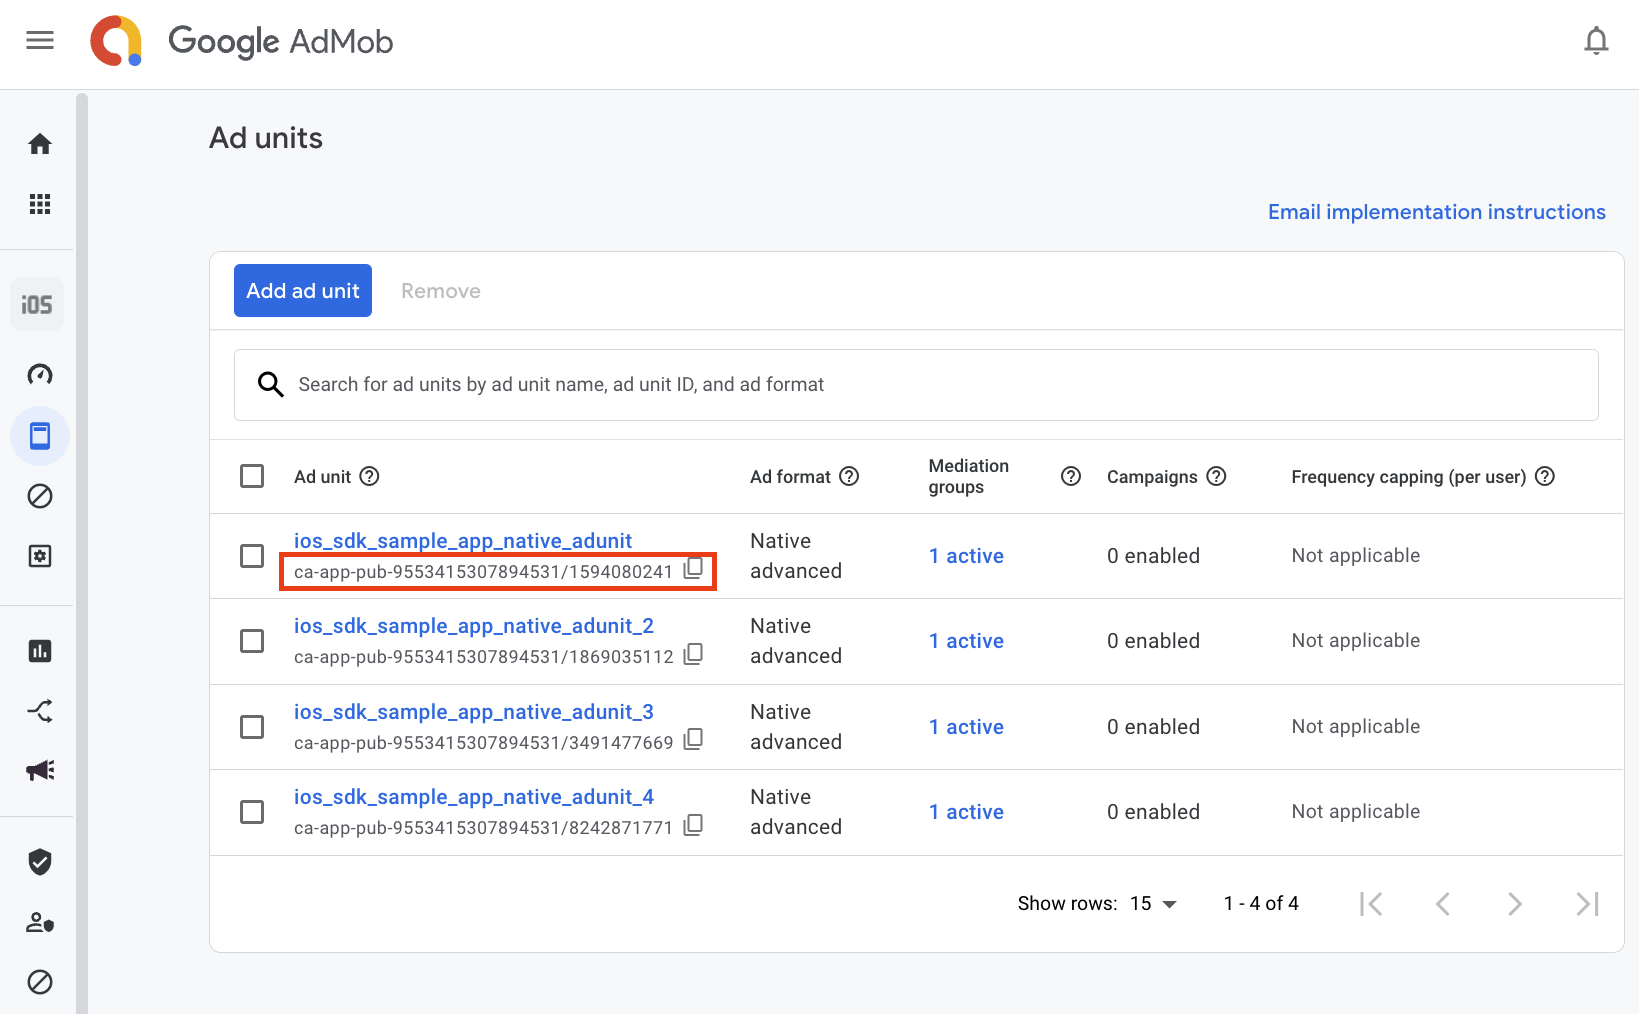
- Get AdMob Ad unit ID for the App
You will need the ad unit ID from AdMob and place it in the iOS App. To find out your ad unit ID, go to the ad unit page and get the ad unit ID.
Note: This is NOT the ad unit id from Appier.
Step 2 - Line item for Appier Mediation
- 2.1 Setup your mediation group
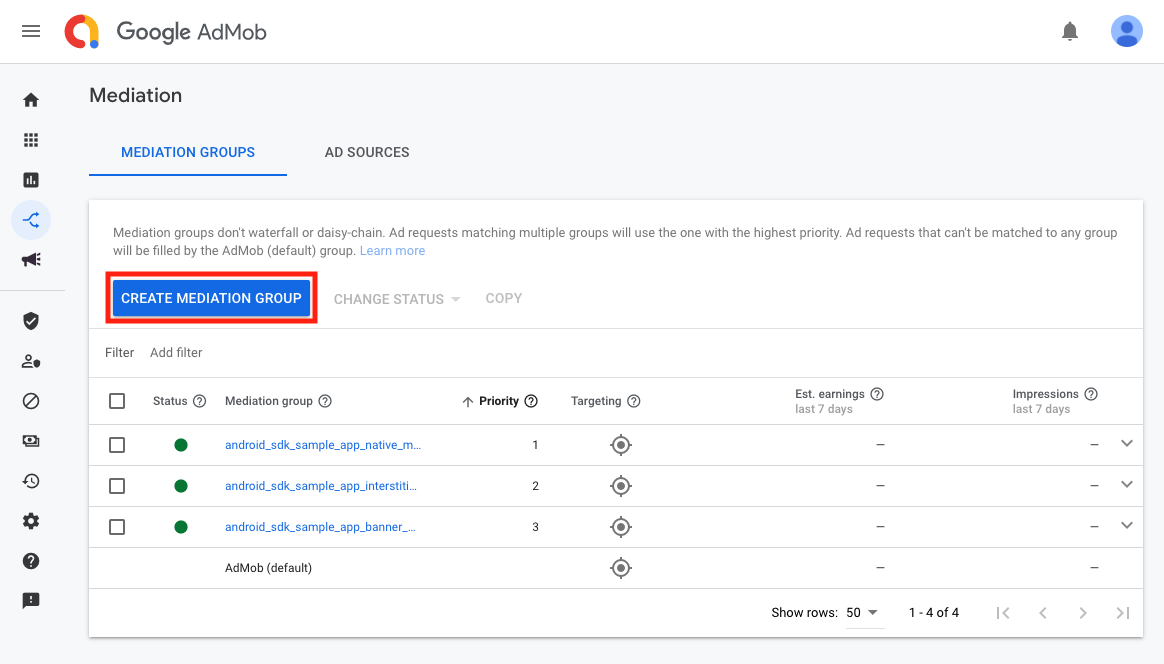
On the Mediation page, please click CREATE MEDIATION GROUP button if you did not have a mediation group.
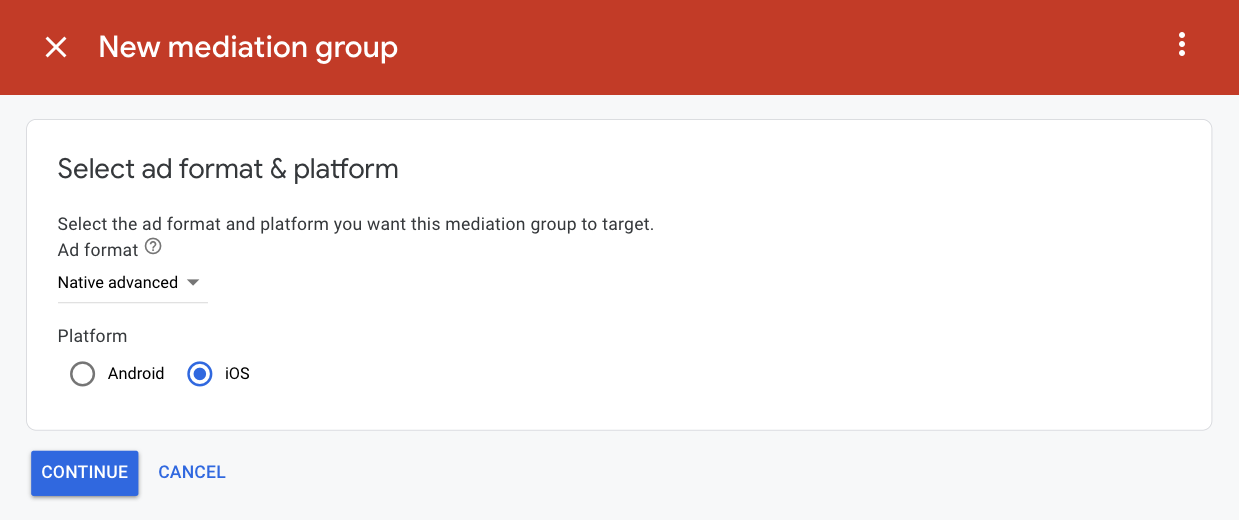
Choose your ad format and Select iOS platform. After finish the setting, click CONTINUE button.
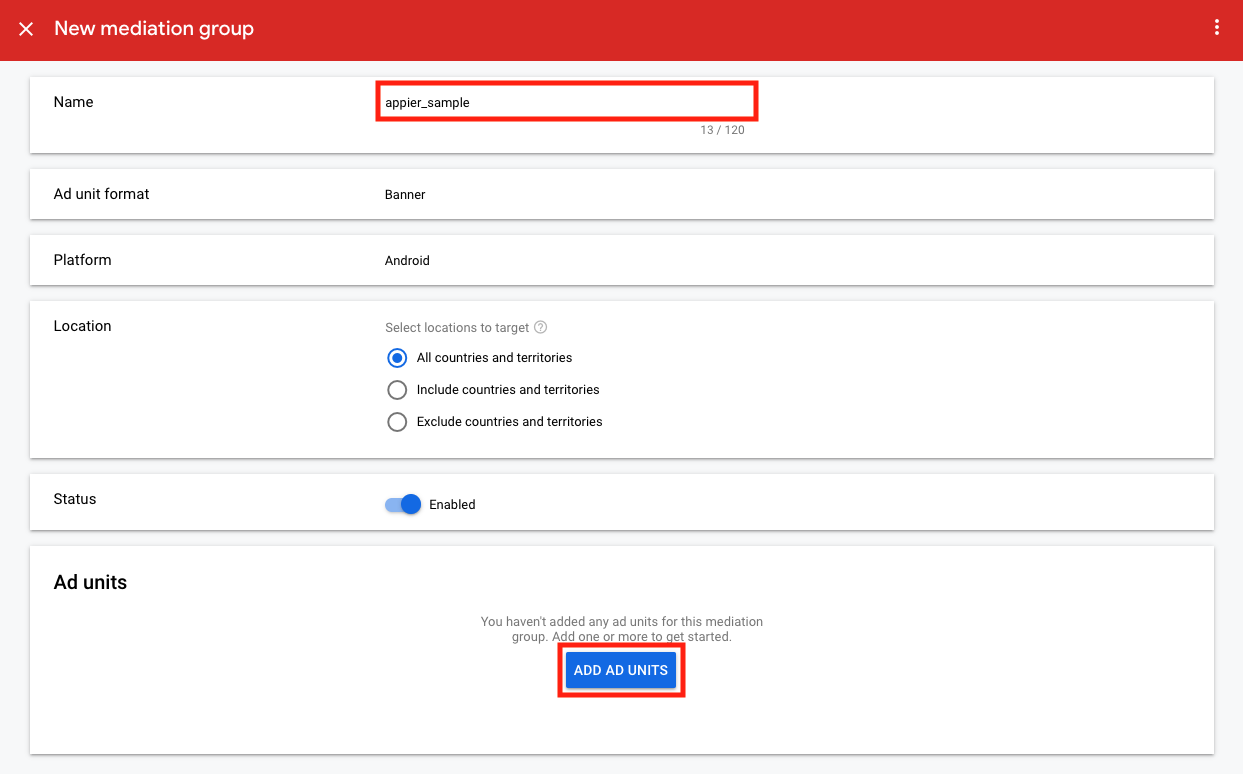
Fill in the mediation group name and add your ad units in the Ad units block. After adding your ad unit in the Ad units block, the Ad sources block will appear.
- 2.2 Setup custom event
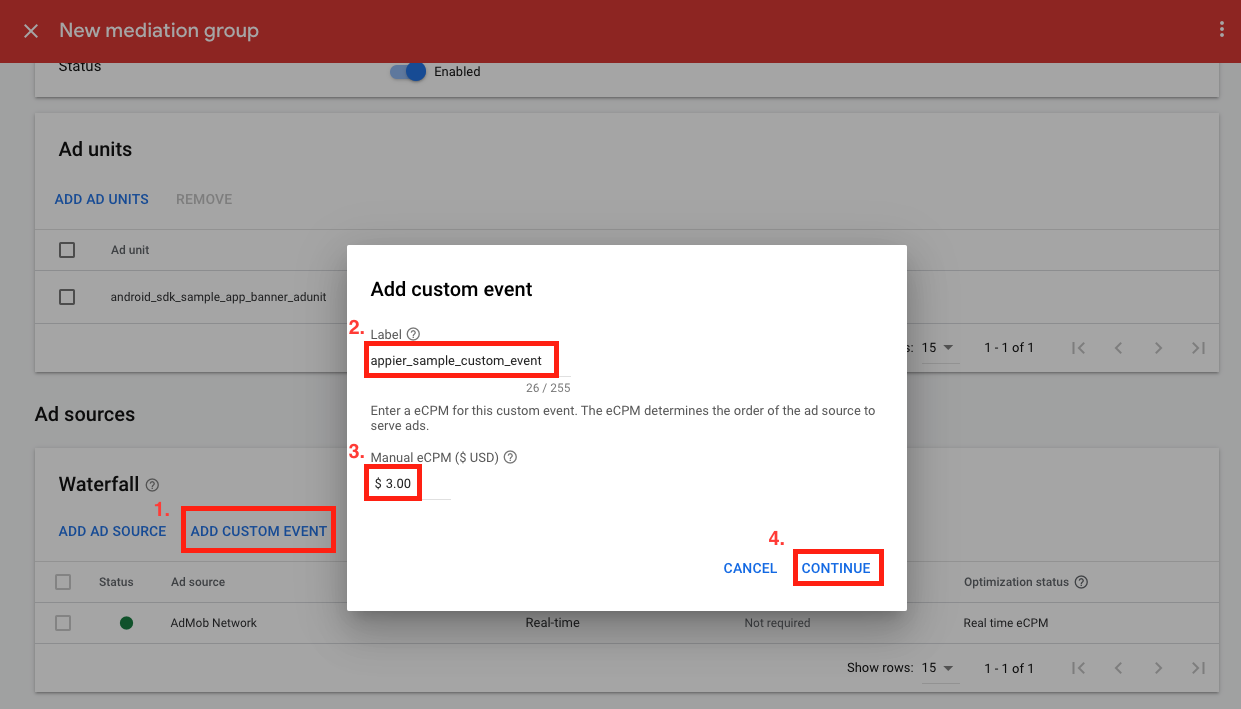
Click ADD CUSTOM EVENT and set your label for Appier custom event. Also, use the price you discussed with Appier Partnership team to set the eCPM.
After all the settings are ready, click CONTINUE.
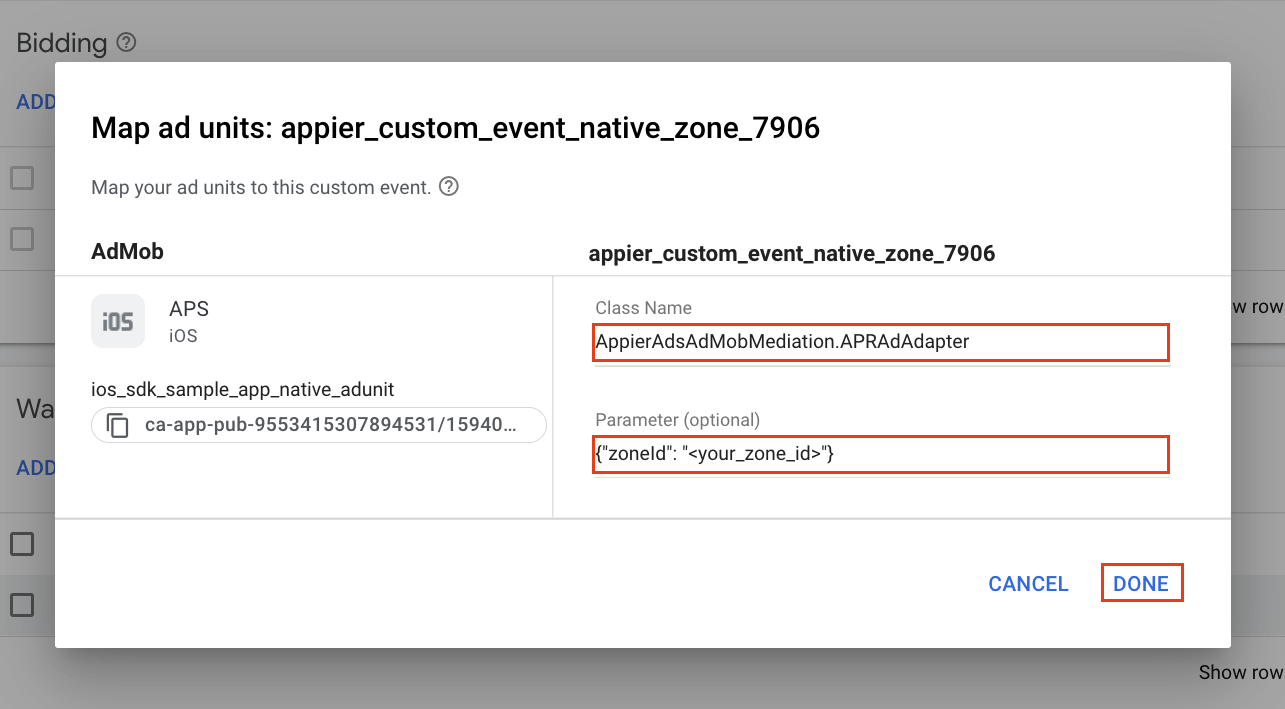
Next, we should set up the custom event class name and parameter.
Class Name: Fillin AppierAdsAdMobMediation.APRAdAdapter
Parameter: fill in the json {"zoneId": "<your_zone_id>"}, where zoneId is provided by Appier.
Click DONE when you finish the setting.
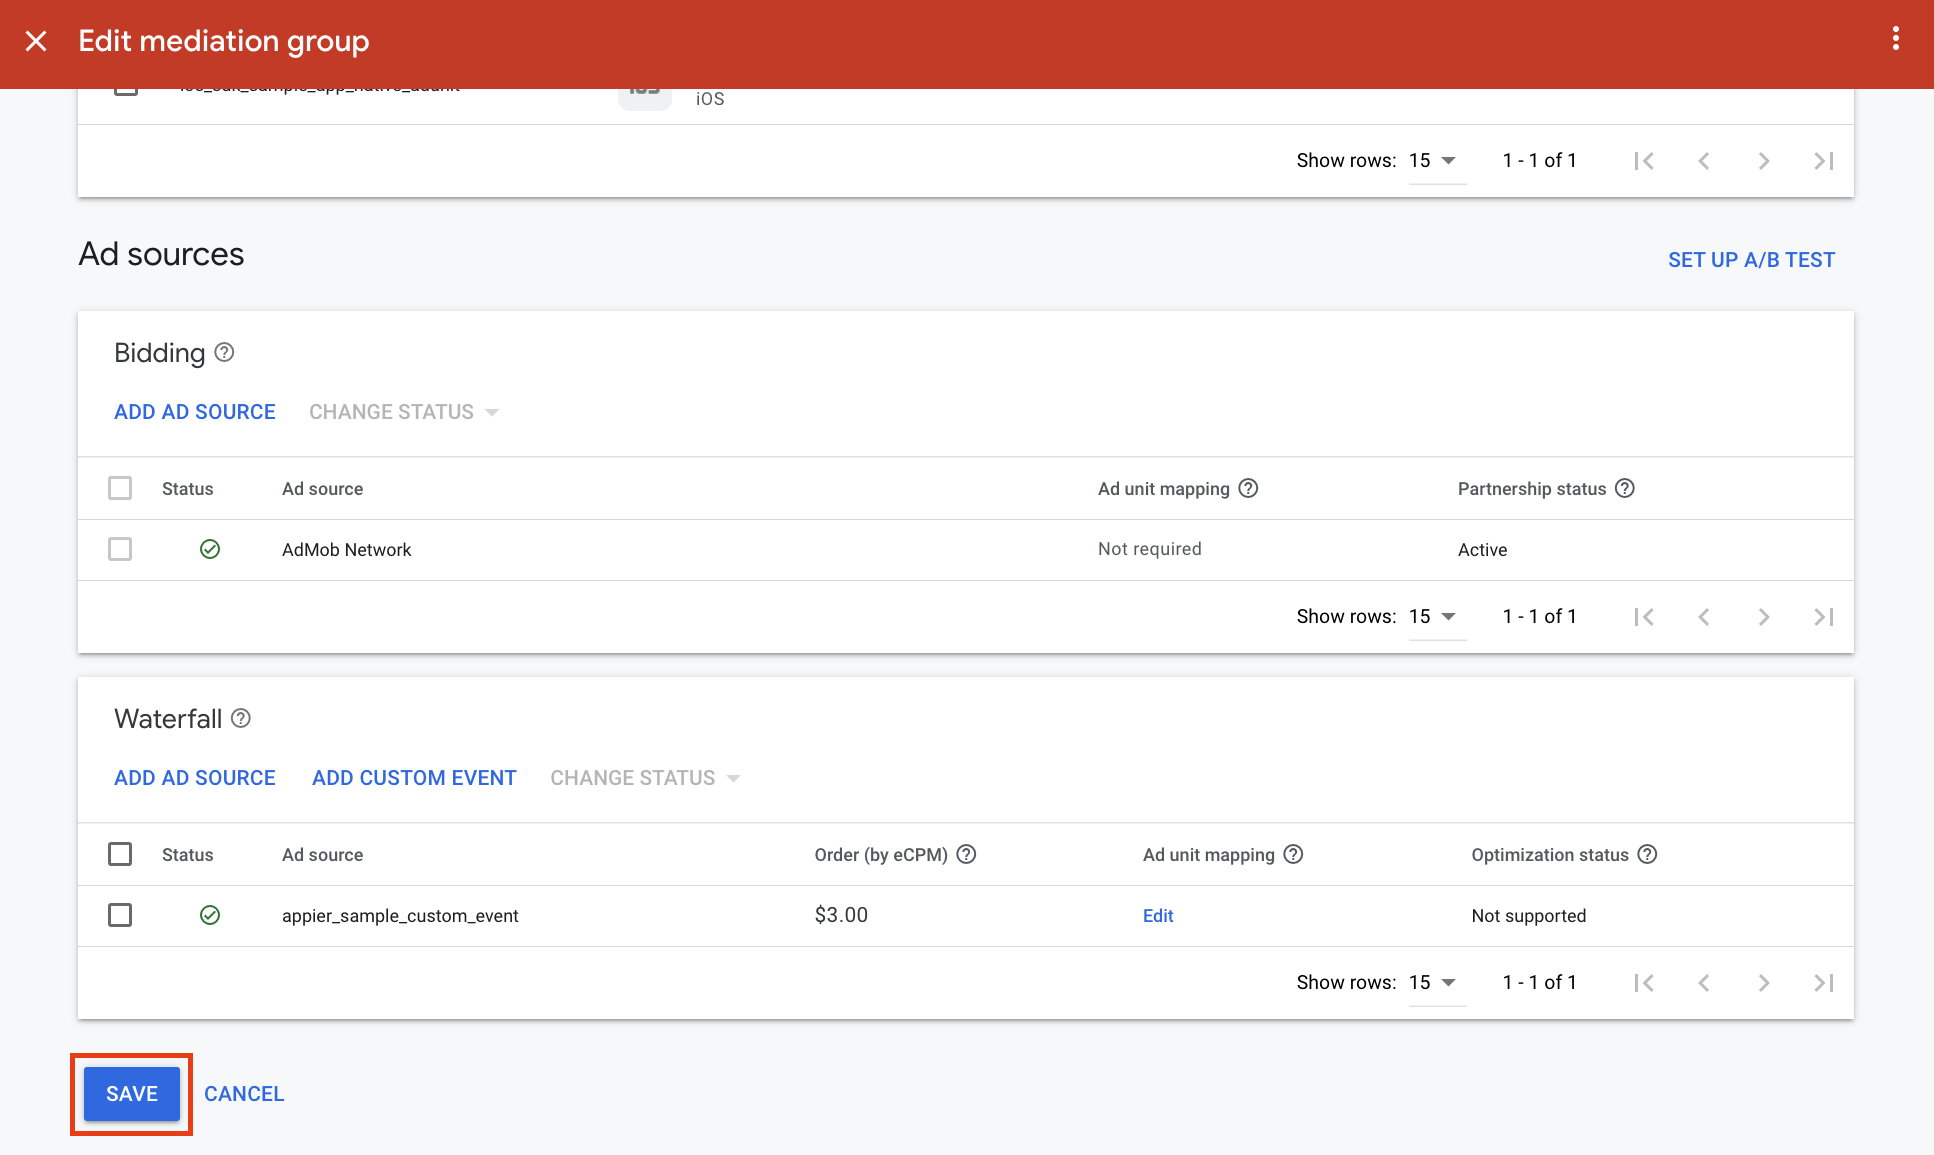
After finishing all of the mediation group settings, you can click SAVE and integrate your iOS app with Appier Mobile SDK.
2. Integrating Appier Mobile SDK
In the previous section, we went through the setup of AdMob web UI. I believe you've already had at least one ad unit ID. In this section, we will focus on how to integrate Appier's SDK and start monetizing your app.
Steps Overview
- Prerequisites
- Installation
- CocoaPods
- Initialize the Ads SDK
- Prepare for iOS 14+
- Enable SKAdNetwork to track conversions
- Request App Tracking Transparency authorization
- GDPR Consent
- Ad Format Integration
- Native Ads Integration
Github Repository
Both the mediation source and sample app are open-sourced on Github: appier/ads-ios-admob-mediation. The latest release version is [1.2.3]
(<https://github.com/appier/ads-ios-sdk>).
Step 1 - Prerequisites
- Make sure you are using AdMob iOS SDK version >= 9.3.0, <= 11.2.0
- Make sure your project's iOS target version >= 12.0
Step 2 - Installation
2.1 - CocoaPods
To integrate AppierAdsAdMobMediation into your Xcode project using CocoaPods, specify the frameworks in your Podfile
pod 'AppierAdsAdMobMediation', '1.2.3'
pod 'AppierAds', '1.1.2'
pod 'Google-Mobile-Ads-SDK', '11.2.0'
Step 3 - Initialize the Ads SDK
Before loading ads, call the start: method on the APRAds.shared, which initializes the SDK and calls back a completion handler once initialization is complete. This only needs to be done once, ideally at app launch and before initializing AdMob Ads SDK.
Here's an example of how to call the start method in your AppDelegate:
import AppierAds
import GoogleMobileAds

@UIApplicationMain
class AppDelegate: UIResponder, UIApplicationDelegate {
  	@Override
    func application(
        _ application: UIApplication,
        didFinishLaunchingWithOptions launchOptions: [UIApplication.LaunchOptionsKey : Any]? = nil
    ) -> Bool {
        // ...
      	APRAds.shared.start(completion: nil)
      	// ...
      	GADMobileAds.sharedInstance().start(completionHandler: nil)
      	// ...
    }
}
Step 4 - Prepare for iOS 14+
4.1 - Enable SKAdNetwork to track conversions
The Appier Ads SDK supports conversion tracking using Apple's SKAdNetwork, which lets Appier attribute an app install when the IDFA is not available.
To enable this functionality, update the SKAdNetworkItems key with an additional dictionary that defines Appier SKAdNetworkIdentifier values in your Info.plist
The snippet below includes Appier(x8uqf25wch.skadnetwork, v72qych5uu.skadnetwork) identifiers.
<key>SKAdNetworkItems</key>
  <array>
    <dict>
      <key>SKAdNetworkIdentifier</key>
      <string>x8uqf25wch.skadnetwork</string>
    </dict>
    <dict>
      <key>SKAdNetworkIdentifier</key>
      <string>v72qych5uu.skadnetwork</string>
    </dict>
  </array>
4.2 - Request App Tracking Transparency authorization
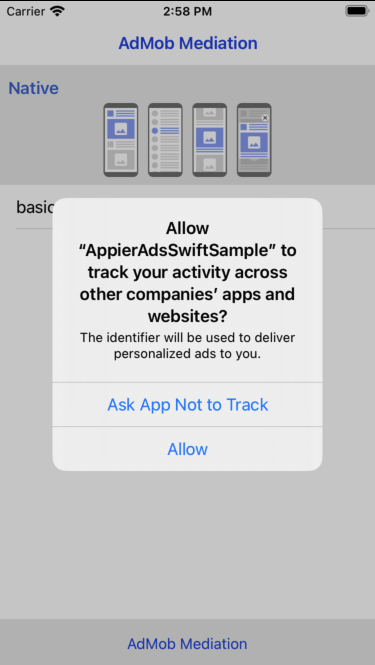
To display the App Tracking Transparency authorization request for accessing the IDFA, update your Info.plist to add the NSUserTrackingUsageDescription key with a custom message describing your usage. Here is an example description text:
<key>NSUserTrackingUsageDescription</key>
	<string>The identifier will be used to deliver personalized ads to you.</string>
To present App Tracking Transparency dialog, call requestTrackingAuthorization. We recommend waiting for the completion callback prior to loading ads so that if the user grants the permission, the Appier Ads SDK can use the IDFA in ad requests.
Here's an example of how to call the requestTrackingAuthorization method in your AppDelegate:
import AppTrackingTransparency

@UIApplicationMain
class AppDelegate: UIResponder, UIApplicationDelegate {
  	func applicationDidBecomeActive(_ application: UIApplication) {
        if #available(iOS 14, *) {
            ATTrackingManager.requestTrackingAuthorization { _ in }
        }
    }
}
The description would display in the App Tracking Transparency dialog:
Step 5 - GDPR Consent (Recommended)
In consent to GDPR, we strongly suggest the consent status to our SDK via APRAds.shared.configuration.gdprApplies so that we will track the user's personal information. Without this configuration, Appier will NOT apply GDPR by default. Note that this will impact advertising performance thus impacting revenue.
This only needs to be done once, ideally at app launch and before initializing Appier Ads SDK.
import AppierAds

@UIApplicationMain
class AppDelegate: UIResponder, UIApplicationDelegate {
  	@Override
    func application(
        _ application: UIApplication,
        didFinishLaunchingWithOptions launchOptions: [UIApplication.LaunchOptionsKey : Any]? = nil
    ) -> Bool {
      	// ...
      	APRAds.shared.configuration.gdprApplies = true
        // ...
      	APRAds.shared.start(completion: nil)
      	// ...
    }
}
Step 6 - Ad Format Integration
Overview
- 6.1 - Native Ads
6.1 - Native Ads Integration
To render Appier's native ads via AdMob mediation, you need to provide <your_ad_unit_id_from_admob> and <your_zone_id_from_appier>. You can either pass through localExtras or serverExtras.
Also, if you want to append any information of ad, you can pass it through localExtras and you will receive the information when events callback.
import AppierAds
import GoogleMobileAds
import AppierAdsAdMobMediation


// Set localExtras
let appierExtras = APRAdExtras()
appierExtras.set(key: .adUnitId, value: "<your_ad_unit_id_from_admob>")
appierExtras.set(key: .appInfo, value: SampleAppInfo())  // pass additional information

// Build Request
let adLoader = GADAdLoader(
	  adUnitID: "<your_ad_unit_id_from_admob>",
  	rootViewController: self,
  	adTypes: [.native],
  	options: nil)

// Load Ad
let request = GADRequest()
request.register(appierExtras)
adLoader.load(request)
AdMob provides the delegate function adLoader to handle native ad. You should create an GADNativeAdView to render Appier Native ad. You can get more details on the Native Ads Advanced
The adLoader sets the text, images and the native ad, etc into the ad view. You can specify Appier native view through the variable advertiser of AdMob native ad.
import GoogleMobileAds
import AppierAdsAdMobMediation

func adLoader(_ adLoader: GADAdLoader, didReceive nativeAd: GADNativeAd) {
  	// ...
    nativeAd.delegate = self

		// when the advertiser name is `Appier`, the ad is provided by Appier.
  	if let advertiser = nativeAd.advertiser, advertiser == APRAdMobMediation.shared.advertiserName {
      	// We provide advertiser image for user to get our advertising ploicy.
				(nativeAdView.advertiserView as? UIImageView)?.image = nativeAd.extraAssets?[APRAdMobMediation.shared.advertiserIcon] as? UIImage

        // Get additional information from APRAdExtras.
        let sampleAppInfo = nativeAd.extrasAssets?[APRAdMobMediation.shared.appInfo] as? SampleAppInfo

      	// ...
	      (nativeAdView.headlineView as? UILabel)?.text = nativeAd.headline
	      (nativeAdView.bodyView as? UILabel)?.text = nativeAd.body
      	(nativeAdView.callToActionView as? UIButton)?.setTitle(nativeAd.callToAction, for: .normal)
      	(nativeAdView.iconView as? UIImageView)?.image = nativeAd.icon?.image

        // Associate the native ad view with the native ad object. This is
        // required to make the ad clickable.
        // Note: this should always be done after populating the ad views.
        nativeAdView.nativeAd = nativeAd
		}
}
Appier provides APRAdMobAdEventDelegate to allow Apps to receive notifications after impression/click events are recorded by AppierSDK.
class AdMobNativeViewController: UIViewController, APRAdMobAdEventDelegate {
    override func viewWillAppear(_ animated: Bool) {
        super.viewWillAppear(animated)
        APRAdMobAdManager.shared.eventDelegate = self  // Register APRAdMobAdEventDelegate
    }

    func onNativeAdImpressionRecorded(nativeAd: APRAdMobNativeAd) {
        APRLogger.controller.debug("adunit id: \(nativeAd.adUnitId)")  // Get ad unit id
        APRLogger.controller.debug("zone id: \(nativeAd.zoneId)")  // Get zone id
        let sampleAppInfo = nativeAd.appInfo as? SampleAppInfo // Get additional information from APRAdExtras
    }

    func onNativeAdImpressionRecordedFailed(nativeAd: APRAdMobNativeAd, error: APRError) {}

    func onNativeAdClickedRecorded(nativeAd: APRAdMobNativeAd) {}

    func onNativeAdClickedRecordedFailed(nativeAd: APRAdMobNativeAd, error: APRError) {}
}
Enabling Test Ads
After integrate with Appier Ads SDK, you can test the ads display correctly via APRAds.shared.configuration.testMode. Without this configuration, Appier would consider the ad is ready for bidding by default.
APRAds.shared.configuration.testMode = .bid // Always display test ads.

APRAds.shared.configuration.testMode = .noBid // Always no bid.

APRAds.shared.configuration.testMode = .bidWithStoreView // Always display store view ads if the device supports.

//...

// Initialize Appier Ads SDK
APRAds.shared.start(completion: nil)
Updated about 2 months ago
